Add authentication in minutes
This guide takes an existing PHP application from a development-only identity to a real Authwave login. You'll register the application, connect the client and protect a page using the returned identity.
Complete a first login
This guide takes an existing PHP application from a development-only identity to a real Authwave login. You'll register the application, connect the client and protect a page using the returned identity.
Have the application running locally, with a page you want people to reach after authentication. You'll also need somewhere private to store server configuration and a PHP environment that meets the client library's Composer requirements. You can complete the first journey on localhost; the application doesn't need to be deployed publicly yet.
1. Create an application and development deployment
Open the Authwave control panel and create an application. Give it the name people will recognise when they leave your application to sign in.
Add a development deployment with the address and return path of your local application. The return route needs to run the client setup shown below, so it can complete authentication before displaying private content.
Copy the deployment's client key into private server configuration. In this example, we'll read it from an environment variable called AUTHWAVE_CLIENT_KEY, set by your server or development environment. Use the full key supplied by the control panel, and keep the value out of browser code and public repositories.
2. Install and initialise the client
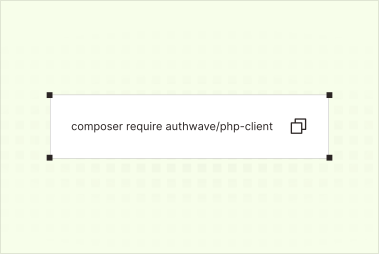
Install the PHP client in your application:
composer require authwave/php-client
Add the following to the early request handling for your return page, before sending output. If the application already loads Composer's autoloader and starts a session, reuse those existing steps.
use Authwave\Authenticator;

require __DIR__ . "/vendor/autoload.php";

if(session_status() !== PHP_SESSION_ACTIVE) {
    session_start();
}

$clientKey = getenv("AUTHWAVE_CLIENT_KEY");
if($clientKey === false || $clientKey === "") {
    throw new RuntimeException("Authwave client key is not configured.");
}

$auth = new Authenticator(
    clientKey: $clientKey,
    currentUriPath: $_SERVER["REQUEST_URI"],
);
The key identifies the configured deployment and supplies the client's secret. The request address allows the authenticator to process the provider's response. Initialisation can redirect the browser while completing that response, which is why it belongs before template output.
This example uses the hosted provider address. If you run your own provider or use another configured hostname, pass it through the constructor's authwaveHost argument as well.
3. Connect the sign-in action
In your application's sign-in action, call:
$auth->login();
For an application with an existing action or route handler, that is the client call to place there. The browser is redirected to Authwave, where the authentication screens are already provided for you.
Follow the journey with a new email address. Signup and login begin at the same place, so you don't need to build a registration form alongside your sign-in action. Choose the password or email-code route and complete the requested checks to return to your application.
4. Protect the page and use the identity
After the client has initialised, check the login state before loading private content:
if(!$auth->isLoggedIn()) {
    $auth->login();
    exit;
}

$authUser = $auth->getAuthUser();
$ownerId = $authUser->id;
This arrangement makes authentication a requirement for the page: a visitor who isn't signed in begins the login journey, while a signed-in visitor continues with an identity available. Public pages can offer a sign-in action instead of redirecting everyone automatically.
Use $ownerId in your application's data access. For example, a private project list should fetch projects owned by that identity, using a parameterised query:
SELECT id, title
FROM project
WHERE owner_id = :owner_id
Here, project and owner_id represent your application's schema; bind the authenticated ID to :owner_id through your database library. An individual project lookup needs an equivalent ownership or membership check. Taking the owner ID from the authenticated identity prevents a visitor from choosing another account simply by changing a form field or query parameter.
If your application has its own account table, create or find the account associated with the authenticated ID first, then use its internal ID in your queries. Keep that association stable when the person changes their email address.
5. Try the other journeys
Repeat the login with the account you've just created, then try email-code authentication. Authwave returns a cancelled login with do=cancel in the query string. Handle that outcome before the automatic login check on a protected return page, offering a public page or a sign-in choice so cancellation doesn't immediately send the person back to the provider. The cancellation value is navigation information, never evidence that someone is authenticated.
Connect your sign-out action to $auth->logout(), using your application's normal protection for actions that change session state. After signing out, open the private page directly and check that its data is unavailable. For the ownership example above, also try two different accounts and confirm that each only receives its own projects.
These checks turn a successful demonstration into an integration you can use as a starting point. They also give you a small journey to repeat when changing provider settings later.
6. Finish the application identity and launch configuration
Add your logo, colours and chosen login address once the connection is working. Check that the application name and return destination still make sense when you follow the flow as a user rather than from the control panel.
When the application is ready for production, create a separate production deployment with its own key and HTTPS return address. Configure that key on the production server, leaving local development connected to its development deployment, then repeat the login and access checks there.
The time saved comes from using the provider's existing signup, login, verification and recovery flow. Your code still controls the application records and permissions, with a short integration connecting them to an authenticated identity. For more detail on the setup and return journey, see Setting up Authwave for the first time.